MS-POWERPOINT.ppt
Introduction:
A PowerPoint presentation consists of a number of slides. Slides are the individual pages of a presentation. PowerPoint makes it easy to add effects to one slide or all the slides in a presentation. You can also animate objects and video or music to a presentation.
Creating a Blank Presentation:
Layouts, Text, and Slides
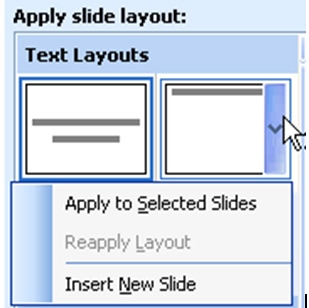
To apply a layout to your new slide:
Step 1:
Scroll through the available layouts in the “Slide Layout” task pane off to the right.
Step 2:
Click on the layout you would like to apply to your slides.
Introduction:
A PowerPoint presentation consists of a number of slides. Slides are the individual pages of a presentation. PowerPoint makes it easy to add effects to one slide or all the slides in a presentation. You can also animate objects and video or music to a presentation.
Creating a Blank Presentation:
- Start PowerPoint. The PowerPoint Window is displayed.
- Choose Blank presentation and click on the OK button.
- The New slide dialog box is displayed.
Layouts, Text, and Slides
To apply a layout to your new slide:
Step 1:
Scroll through the available layouts in the “Slide Layout” task pane off to the right.
Step 2:
Click on the layout you would like to apply to your slides.
To insert and format text in a slide:
Step 1:
Click inside a placeholder.
Step 2:
Enter text. You may use the formatting toolbar at the top of the PowerPoint window to apply various formats to your selected text. You may notice this toolbar is identical to the one used in Microsoft Word.
Step 3:
When you are finished entering text, click outside the placeholder on some “empty space.”
To delete text:
Option #1: Highlight the text you want to delete by dragging the cursor over the letters, and press the delete key.
Option #2: Click on the selection rectangle around the text so that its border changes from hatch marks to dots, and then press the delete key.
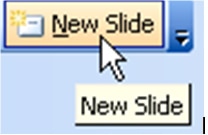
To insert a new slide: (ctrl + M)
Option #1: Go to Insert->New Slide. A blank slide will appear in the workspace, positioned after the selected slide or slide you were viewing.
Option #2: Click on the "New Slide” button on the formatting toolbar at the top of the PowerPoint window.
To delete a slide:
Option #1: Go to Edit->Delete Slide. The current slide will disappear from the workspace.
Option #2: On the Slides pane (off to the left), click on the slide you would like to delete, and then hit the <Delete> key.
Design Templates and Images:
To change the design template:
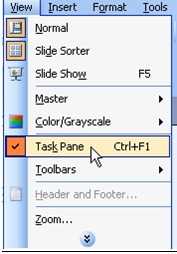
Step 1:
Go to View->Task Pane. Verify that this option has a checkmark next to it. If it does not, click once on the "Task Pane" option.
Step 2:
You will see the current Task Pane on the right-hand side of the PowerPoint window. This Task Pane should be labelled "Slide Design". If it is not, click once on the directional arrow to the right of the Task Pane title, and select "Slide Design."
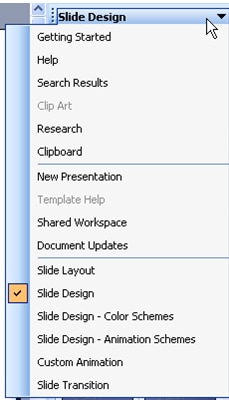
Step 3:
You will see a number of design templates displayed in the Task Pane. Use the scrollbar to browse through the available templates.
Step 4:
Click once on the design template you would like to apply to your presentation.
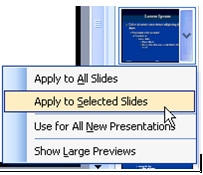
If you would like to apply the design template to only selected slides, mouse over the desired template, and click on the arrow button that appears on the left side of the template icon. From the menu given, choose Apply to Selected Slides.
You will see a number of design templates displayed in the Task Pane. Use the scrollbar to browse through the available templates.
Step 4:
Click once on the design template you would like to apply to your presentation.
If you would like to apply the design template to only selected slides, mouse over the desired template, and click on the arrow button that appears on the left side of the template icon. From the menu given, choose Apply to Selected Slides.
To insert a picture into your presentation:
Option #1: If you have already saved the picture you would like to insert, go to Insert->Picture->From File, and navigate to your picture file. Select your file, and click “Insert”. Your picture will appear on the current slide.
Option #2: If you would like to insert clip art:
i. Go to Insert->Picture->Clip Art. You will see that the "Insert Clip Art" task pane is visible on the
right side of the PowerPoint window.
ii. If you know what kind of clip art you want, enter a word that describes it in the text box labelled
"Search Text and hit <Search>. Otherwise, simply hit <Go>.
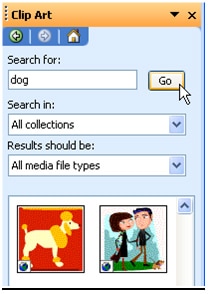
iii. Use the scrollbar to browse through available clip art.
iv. Click once on the clip art you would like to insert. Your clip art will appear on the current slide,
with sizing handles visible.
To change the shape of a picture:
Step 1:
Move your cursor over the picture and click once to select it. You will see a number of small circles appear a long the edge of the picture. These circles are called "sizing handles." There is also one green circle, which is used to rotate the image.

Step 2:
Click on one of the sizing handles that appears on a side of the picture, hold the mouse button down, and drag the handle to change the shape of the picture. Your pointer will be a double-sided arrow when you are directly over a sizing handle. You are distorting the picture by stretching or squishing it.
Step 3:
Release the mouse button when you have achieved the desired shape.
To change the size of a picture:
Step 1:
Move your cursor over the picture and click once. You will see the sizing handles described above.
Step 2:
Click your cursor on one of the sizing handles that appears on the corner of the picture, hold the mouse button down, and drag the picture to make it smaller or larger. Using these corner handles maintains the original proportions of the image (it does not stretch or squish).
Step 3:
Release the mouse button when you have achieved the desired size.
Drawing Tools:
Sometimes you need to create your own visual effects to get your point across. The drawing tools give you the ability to do this.
To view the Drawing toolbar, go to View->Toolbars->Drawing. Click on Drawing so that a check mark
appears beside it on the menu.
The following is an explanation of basic tools on the toolbar, from right to left:
Auto shapes: This button gives you the option to insert pre-designed objects such as lines, arrows, basic shapes, and action buttons, among other things. Simply choose one of the options from the Auto shapes menu, then click or click and drag (depending on which object you choose) on your slide to insert that object. You can then manipulate that object by using the sizing handles, as mentioned in the previous section, Design Templates and Images.
Line and Arrow: These tools allow you to insert lines or arrows by clicking the tool, then clicking and
Dragging in your slide.
Rectangle and Oval: These tools allow you to insert rectangles or ovals by clicking the tool, then clicking and dragging in your slide.
Step 2:
Click on one of the sizing handles that appears on a side of the picture, hold the mouse button down, and drag the handle to change the shape of the picture. Your pointer will be a double-sided arrow when you are directly over a sizing handle. You are distorting the picture by stretching or squishing it.
Step 3:
Release the mouse button when you have achieved the desired shape.
To change the size of a picture:
Step 1:
Move your cursor over the picture and click once. You will see the sizing handles described above.
Step 2:
Click your cursor on one of the sizing handles that appears on the corner of the picture, hold the mouse button down, and drag the picture to make it smaller or larger. Using these corner handles maintains the original proportions of the image (it does not stretch or squish).
Step 3:
Release the mouse button when you have achieved the desired size.
Drawing Tools:
Sometimes you need to create your own visual effects to get your point across. The drawing tools give you the ability to do this.
To view the Drawing toolbar, go to View->Toolbars->Drawing. Click on Drawing so that a check mark
appears beside it on the menu.
The following is an explanation of basic tools on the toolbar, from right to left:
Auto shapes: This button gives you the option to insert pre-designed objects such as lines, arrows, basic shapes, and action buttons, among other things. Simply choose one of the options from the Auto shapes menu, then click or click and drag (depending on which object you choose) on your slide to insert that object. You can then manipulate that object by using the sizing handles, as mentioned in the previous section, Design Templates and Images.
Line and Arrow: These tools allow you to insert lines or arrows by clicking the tool, then clicking and
Dragging in your slide.
Rectangle and Oval: These tools allow you to insert rectangles or ovals by clicking the tool, then clicking and dragging in your slide.
Text Box: Clicking this tool and then clicking in your slide inserts a box in which you can type an unlimited amount of text. You can also resize a text box using the sizing handles, the same way you resize an image.
WordArt: this tool gives you some dramatic, pre-designed styles for formatting your text. Once you select a style and enter your text in the WordArt dialogue box, your text is added to your slide. You can manipulate that WordArt object as you would an image or text box.
Insert Diagram or Organizational Chart: this tool gives you some pre-designed diagrams or charts to choose from, which are then inserted into your slide. Again, you can manipulate these (position, size, shape) as you would an image or text box.
Insert Clip Art and Insert Picture: these tools open the clip art task pane or ask you to navigate to an image file, respectively. Once you click on the clip art you want, or the image file you want, your selection is inserted into your slide.
Fill color: this tool allows you to choose whether to fill a selected object on your slide with a color. You can choose the color, and you also have choices of effect, such as texture, pattern, and gradient.
Line Color: similar to fill color, line color lets you assign color to lines in your slide. You may apply line color to line objects, or to the lines around selected shapes or text boxes.
Text Color: this lets you assign color to text in a selected text box.
Line, Dash and Arrow Style: these tools let you change the weight (how thick or thin), the solidity (dashes or dots) and the endpoints (arrows, circles, diamonds) of a selected line.
Add transitions between slides:
Slide transitions are the animation-like effects that occur in Slide Show view when you move from one slide to the next during an on-screen presentation. You can control the speed of each slide transition effect, and you can also add sound.
Microsoft Office PowerPoint 2003 includes many different types of slide transition.
No transition
Blinds Horizontal
Blinds Vertical
Box In
Box Out
Checkerboard Across
Checkerboard Down
Comb Horizontal
Comb Vertical
Insert a movie from a file:
You can insert a movie from a movie file on a local disk, a shared network location, or an Internet site.
1. On the Insert menu, point to Movies and Sounds, and then click Movie from File.
2. Select the movie file in the Insert Movie dialog box, and then click the OK button.
Insert a sound:
Sound effects, such as music and voice recordings, can add another level of professionalism to your slide presentations. Music is an effective way to introduce or end a presentation and it gives your audience something to listen to as they enter and leave the presentation room.
Views and Printing:
To manipulate your slides in "Slide Sorter" views:
Step 1:
Go to View->Slide Sorter.
Step 2:
To rearrange slides, click on the slide you wish to move, hold down the mouse button, and move
the object to a new location in the presentation (between slides, at the beginning or at the end).
Lift up on the mouse button when you are satisfied with the new location. A vertical line between
the slide indicates the position to which you are moving the slide.
Step 3:
To return to Normal view, go to View-> Normal.
To print your presentation:
Step 1:
Go to File->Print Preview. You will be shown a preview of how your printed document will look
like.
Step 2:
If you are satisfied with the appearance of your document, click on the "Print" button at the top left
of the preview window. Otherwise, click on the "Close" button and make any necessary changes.
