MS- WORD
TITLE BAR – THIS BAR IS SHOWS THE NAME OF THE PROGRAME.
MENU BAR- THIS IS THE LIST OF PROGRAME MENU.
STANDARD TOOLBAR – THIS TOOLBAR SHOWS THE COMMON BUTTONS OF THE WINDOWS.
FORMATTING TOOLBAR- THIS TOOLBAR IS USED TO FORMATTING THE DOCUMENT.
RULLER BAR- THE RULLER BAR IS USED TO SET THE MARGINS OF THE PAGE.
VERTICAL SCROLLBAR- VERTICAL SCROLLBAR IS USED TO SCROLL THE PAGE UP OR DOWN.
HORIZONTAL SCROLL BAR – THIS BAR IS USED TO SCROLL THE PAGE LEFT OR RIGHT.
DRAWING TOOLBAR – THIS TOOL BAR IS USED TO DRAWING THE OBJECTS LIKE, RECTANGLE,
CIRCLE etc.
STATUS BAR – THIS BAR IS SHOWS THE CURRENT POSITION OF THE CURSOR.
CREATING A NEW DOCUMENT: (CTRL+N)
The steps to creating a new document are-
The steps to save a document are-
The steps to open a document are-
TITLE BAR – THIS BAR IS SHOWS THE NAME OF THE PROGRAME.
MENU BAR- THIS IS THE LIST OF PROGRAME MENU.
STANDARD TOOLBAR – THIS TOOLBAR SHOWS THE COMMON BUTTONS OF THE WINDOWS.
FORMATTING TOOLBAR- THIS TOOLBAR IS USED TO FORMATTING THE DOCUMENT.
RULLER BAR- THE RULLER BAR IS USED TO SET THE MARGINS OF THE PAGE.
VERTICAL SCROLLBAR- VERTICAL SCROLLBAR IS USED TO SCROLL THE PAGE UP OR DOWN.
HORIZONTAL SCROLL BAR – THIS BAR IS USED TO SCROLL THE PAGE LEFT OR RIGHT.
DRAWING TOOLBAR – THIS TOOL BAR IS USED TO DRAWING THE OBJECTS LIKE, RECTANGLE,
CIRCLE etc.
STATUS BAR – THIS BAR IS SHOWS THE CURRENT POSITION OF THE CURSOR.
CREATING A NEW DOCUMENT: (CTRL+N)
The steps to creating a new document are-
- Choose the new option from the file menu.
- A New dialog box is displayed.
- Choose blank document.
- A New Document window is displayed on the screen.
The steps to save a document are-
- Choose the Save option from the file menu. The Save as dialog box is displayed.
- Type the file name in the Filename text box. Click on the Save button.
The steps to open a document are-
- Select the open option from the File menu.
- Type the file name in the filename text box.
- Click on the open button.
- Place the insertion point to the left of the first character you wish to select.
- You can use the following key combination to select the text.
- Shift + Select one character to the right.
Shift + Select one character to the left.
SELECTING TEXT WITH MOUSE:
To select the text using mouse-
The Undo Command is used to reverse a command given earlier. To reverse an earlier command,
Click the undo button or select the undo
option from the Edit menu.
Shortcut button- Ctrl + z
REDO COMMAND:
Redo command is used to reverse the action that you undo. To redo the previous action,
Click the Redo button or select the Redo option
from the Edit menu.
Shortcut button- Ctrl + y
COPYING TEXT:
The Copy Command is used to create the duplicate of the selected text. The Copy and Paste features
of MS- Word can be copy text from
one location to another location. To copy text-
Ctrl + v (Paste)
MOVING TEXT:
To move the text-
Ctrl + v (Paste)
CHARACTER FORMATTING:
Character formatting can be applied in the following ways-
Font: To change the font with the formatting toolbar.
To change the font size with the formatting toolbar.
You can have your text lined up
at the left side, at the center or at the right side of the page. To change the alignment of any text.
Right Alignment ( Ctrl+ R)
Center Alignment (Ctrl+ E)
Justify Alignment ( Ctrl+ J)
- Shift + Select one line up.
- Shift + Select one line down.
- Shift + Home To the beginning of the current line.
- Shift + End To the end of the current line.
- Ctrl + A to select the entire all document.
SELECTING TEXT WITH MOUSE:
To select the text using mouse-
- Place the insertion point to the left of the first character to select.
- Hold down the left mouse button and drag it to where you want to stop the selecting.
- Release the mouse button.
- Double click in a word to select it.
- Triple click in a paragraph to select it.
- Ctrl + click in a sentence to select it.
The Undo Command is used to reverse a command given earlier. To reverse an earlier command,
Click the undo button or select the undo
option from the Edit menu.
Shortcut button- Ctrl + z
REDO COMMAND:
Redo command is used to reverse the action that you undo. To redo the previous action,
Click the Redo button or select the Redo option
from the Edit menu.
Shortcut button- Ctrl + y
COPYING TEXT:
The Copy Command is used to create the duplicate of the selected text. The Copy and Paste features
of MS- Word can be copy text from
one location to another location. To copy text-
- Select the text.
- Click the Copy button or select the Copy option from the Edit menu.
- Position the insertion point at the location where you want to paste the text.
- Click the Paste button or select the Paste option from the Edit menu.
Ctrl + v (Paste)
MOVING TEXT:
To move the text-
- Select the text.
- Click the Cut button or select the Cut option from the Edit menu.
- Position the insertion point at the location where you want to paste the text.
- Click the Paste button or select the Paste option from the Edit menu.
Ctrl + v (Paste)
CHARACTER FORMATTING:
Character formatting can be applied in the following ways-
- Using the Formatting Toolbar.
- Using the Font dialog box.
Font: To change the font with the formatting toolbar.
- Select the text.
- Click the drop down list button on the font box and select the new font from the list.
To change the font size with the formatting toolbar.
- Select the text.
- Click the drop down list button on the font size box and select the font size from the list.
- Select the text.
- Click on the bold button on the formatting toolbar.
- Select the text.
- Click on the Italic button on the formatting toolbar.
- Select the text.
- Click on the Underline button on the formatting toolbar.
- Select the text
- Click on the Font colour drop down arrow and choose the colour you want.
- Select the text.
- Click the highlighting button. The default colour is yellow.
You can have your text lined up
at the left side, at the center or at the right side of the page. To change the alignment of any text.
- Select the text.
- Click the Align Left button or Center button or Right button Justify button on the formatting toolbar.
Right Alignment ( Ctrl+ R)
Center Alignment (Ctrl+ E)
Justify Alignment ( Ctrl+ J)
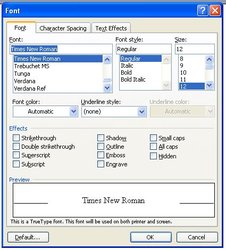
USING THE FONT DIALOG BOX:
- Select the text to be formatted.
- Choose the Font option from the format menu.
- The Font box dialog box is displayed.
SPELL CHECK:
You must have noticed that when you are writing some text, you may get
red or green wavy lines below the words.
A red wavy line indicates that either the spelling is incorrect or the spelling may correct but the
word is not in the MS- Word dictionary.
A green wavy line indicates grammatical errors.
CHANGE CASE:
There are five case options in MS- Word –
Sentence Case: First character in the sentence is in upper case and rest are in lower case.
Sometimes you need to search a particular word or text in a document or sometimes you need
to replace some text or word in the document.
You can use MS- Word find command. The steps to find text in a document are:
A bullet is a dot or a symbol that marks an important line of information. By default,
MS – Word uses a simple black dot. To create a bullet.
Before printing a document you can use words print preview mode to make sure that the
document looks the way you want it to. For this choose the Print Preview option from the
File menu to display the current document in the print preview mode. To exit from Print
Preview click the close preview button on the print preview toolbar.
If you want to print a single copy of the whole document click the print button on the
standard toolbar.
Tables in MS-Word:
A table is a grid of horizontal rows and vertical columns into which you can enter text.
The rectangular area at the Intersection of a column and a row in a table, into which
you enter text, is called cell.
To create a table-
is called cell.
6) Select the line style from the line style drop down list.
7) Select the desired line width drop down list.
8) Select the desired line color from the Line color drop down list.
9) Click the Shading tab.
10) Select the desired color for the shading.
11) Click the Page Border tab.
12) You can choose the page border.
13) Click on the OK button.
Creating WordArt:
MS-word Drawing Toolbar provides tools for creating basic shapes such as lines,
arrows, rectangles, circles etc.
Drawing Autoshapes: To draw an autoshapes.
To apply shadow to an object
To insert a ClipArt.
Performing a mail merge involves three basic steps.
You must have noticed that when you are writing some text, you may get
red or green wavy lines below the words.
A red wavy line indicates that either the spelling is incorrect or the spelling may correct but the
word is not in the MS- Word dictionary.
A green wavy line indicates grammatical errors.
CHANGE CASE:
There are five case options in MS- Word –
Sentence Case: First character in the sentence is in upper case and rest are in lower case.
- Lower Case: All characters are in lower case.
- Upper Case: All characters are in upper case.
- Title Case: First character of each word is in upper case.
- Toggle Case: Case is reversed for all characters.
- Select the text.
- Choose Change Case option from the Format menu.
- A change case dialog box is displayed from where you can choose the desired option.
- Click on the OK button.
Sometimes you need to search a particular word or text in a document or sometimes you need
to replace some text or word in the document.
You can use MS- Word find command. The steps to find text in a document are:
- Select the find option from the Edit menu.
- A dialog box is displayed.
- In the find what box enters the text you want to search for?
- In the replace with box enter the text you want to change.
A bullet is a dot or a symbol that marks an important line of information. By default,
MS – Word uses a simple black dot. To create a bullet.
- Position the insertion point at the location where you want to start the list.
- Select the Bullets and Numbering option from the format menu.
- Click the Bulleted tab.
- You can click any bullet from the seven built in bullet symbols.
- Click on the ok button.
- Position the insertion point at the location where you want to start the list.
- Select the Bullets and Numbering option from the format menu.
- Click the Numbered tab.
- You can click any bullet from the seven built in numbered.
- Click on the ok button.
- To create columns from existing text, select it.
- Choose the Columns option from the format menu. The columns dialog box is displayed.
- Choose the number of columns you want to create.
Before printing a document you can use words print preview mode to make sure that the
document looks the way you want it to. For this choose the Print Preview option from the
File menu to display the current document in the print preview mode. To exit from Print
Preview click the close preview button on the print preview toolbar.
If you want to print a single copy of the whole document click the print button on the
standard toolbar.
Tables in MS-Word:
A table is a grid of horizontal rows and vertical columns into which you can enter text.
The rectangular area at the Intersection of a column and a row in a table, into which
you enter text, is called cell.
To create a table-
- Position the insertion point at the location you want to create a table.
- Select Table – Insert table.
- An insert table dialog box is displayed.
- Type in the number of columns.
- Type in the number of rows.
- Click on the OK button.
- To add border and shading to the entire table.
- Select the table.
- Choose the Border and Shading option from the Format menu.
- The Border and Shading dialog box is display.
is called cell.
6) Select the line style from the line style drop down list.
7) Select the desired line width drop down list.
8) Select the desired line color from the Line color drop down list.
9) Click the Shading tab.
10) Select the desired color for the shading.
11) Click the Page Border tab.
12) You can choose the page border.
13) Click on the OK button.
Creating WordArt:
- Click the WordArt button on the drawing toolbar. Or
- Select – Insert – Picture – WordArt
- The WordArt Gallery dialog box appears.
- Click the desired style.
- Click on the ok button.
MS-word Drawing Toolbar provides tools for creating basic shapes such as lines,
arrows, rectangles, circles etc.
Drawing Autoshapes: To draw an autoshapes.
- Click the autoshape button on the drawing toolbar.
- Select the desired option.
- Click the desired shape.
- Click at the position in the document where you want to the mouse draw the shape.
- Drag the mouse to draw the shape.
To apply shadow to an object
- Select the object.
- Click the shadow button on the drawing toolbar.
- Click the desired shadow effect.
- Select the object whose shadow setting are to be changed.
- Click the shadow button on the Drawing toolbar.
- Click Shadow Setting.
- The shadow setting toolbar is displayed.
- Click the desired button to shift the position of the shadow.
To insert a ClipArt.
- Select Insert – Picture – ClipArt
- The Insert ClipArt dialog box is displayed.
- Select the desired category.
- Click the ClipArt image.
- Click the Insert button.
Performing a mail merge involves three basic steps.
- Creating the main document.
- Creating the data source.
- Merging the data source and the main document.
